User guide
In short: Install the app on a PS3 with custom firmware (glossary), start it, put in a PS1 disc and press . The app copies the disc to files on the hard disk and checks that the copy is exact. This page explains the screen and every step, from installing to playing your copies.
This guide walks through PSX RiPPER from installing it to playing your rips. For every setting and file see configuration; for questions see the FAQ.
Before you start
You need a PS3 with custom firmware and Cobra (glossary) (developed on Evilnat 4.93), with PS3MAPI (glossary). webMAN MOD (glossary) is recommended: PSX RiPPER uses it to unmount a mounted image before reading and to refresh the game list when you exit.
Optional: one or two Apple USB SuperDrives (glossary) (model A1379, USB ID 05AC:1500) to rip up to three discs at the same time. They run on the PS3's USB power; no Y-cable is needed.
Installing
- Download
psxripper-<version>.pkgfrom the releases (opens in a new tab). - Copy it to the PS3: a USB stick, FTP, or webMAN's Install PKG.
- Install it with Package Manager → Install Package Files and start PSX RiPPER from the XMB (glossary), under Game (webMAN may list it under Unknown). Installing a newer version over an older one keeps your settings.
The screen
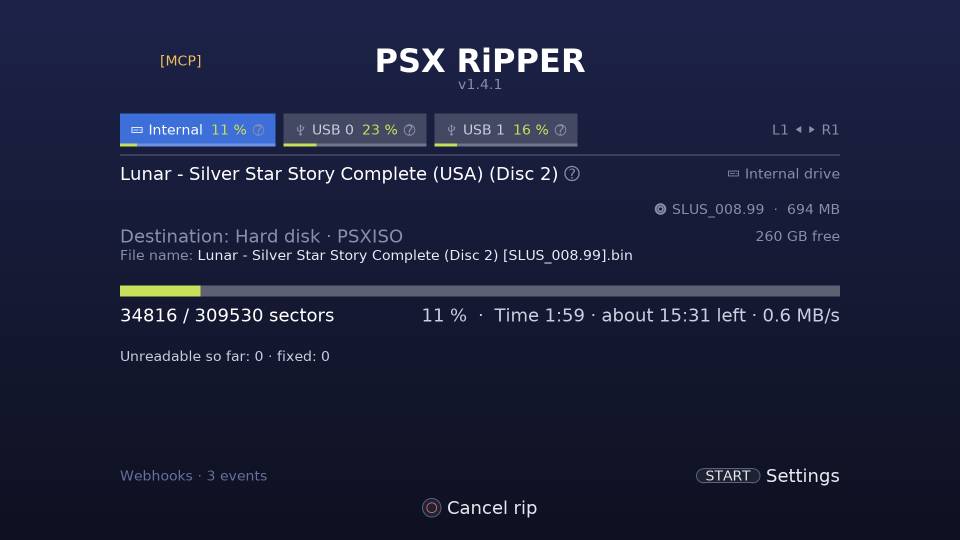
Every drive has a tab: Internal (the PS3's drive), and USB 0 / USB 1 for SuperDrives, named after the USB port. L1 / R1 (or up / down) move between the tabs. The tab shows the drive's state (Empty, Reading, Ready, a percentage while it rips, Done) and an icon for the disc or the last rip:
| Icon | Meaning |
|---|---|
| 🏅 medal | The rip matches Redump (glossary): it is bit-perfect (glossary) |
| ⚠ warning | The rip does not match Redump, or it has sectors (glossary) that could not be read |
| ? question mark | Not checked against Redump (yet) |
The page under the tabs shows, for the drive you are on:
- The disc: its name (Redump's name when known, else the title from the built-in list), the serial and size, and on the right the drive.
- Disc: whether it is already ripped to the destination, how that rip stands (verified, does not match, not checked, known errors) and what you can do about it.
- Destination: where the rip goes, the free space, and the file name.
The bottom row lists the buttons for this tab. Above it, START opens the settings and exits (only when nothing is ripping).
Ripping a disc
- Insert the disc. The tab says Reading, then Ready with the disc's name.
- Press Rip. With Rip immediately when a disc is inserted on, this happens by itself.
- The page shows the progress: the bar, what the app does, the percentage and the time left, and the events: sectors that were hard to read and what happened to them.
A full disc takes about four minutes on the internal drive and longer on a SuperDrive. The rip goes through up to three steps:
| Step | What happens |
|---|---|
| Reading | The whole disc, every data sector checked against its checksum (EDC/ECC (glossary)) |
| Double-checking sectors without a checksum | Video and sound sectors have no checksum, so they are read once more and compared; a sector that differs is read until three reads agree |
| Re-reading uncertain sectors slowly | Sectors that could not be read are tried again at low speed with the drive's own retries |
Skip re-reads ends the slow re-reads and keeps the rip as it is; you can repair it later. Cancel rip stops the rip; an earlier rip of the same disc stays untouched.
With Eject the disc when done on, the disc comes out when the rip is finished.
After a rip
The tab says Done and keeps a line about the last rip, even after the disc is ejected:
Last rip, Final Fantasy IX (Europe) (Disc 1) (SLES_029.65): Done · 4:12 🏅 Matches Redump
A rip that matches Redump is bit-perfect: every track's MD5 (glossary) equals the reference. One that does not match has unreadable sectors (see below), or the disc is a burned copy or a version Redump does not list; see the FAQ. Not checked means Redump was off or knows no such disc.
Damaged discs and Repair
Scratches can make sectors unreadable. The rip still finishes; the sectors that could not be
read are written into the rip's log (<name>.bin.log) and the tab shows the warning icon and
Known errors: n sectors.
- Clean the disc.
- Insert it again and press Repair. With automatic start on, inserting it starts the repair by itself.
- Repair reads only the listed sectors, writes the ones it gets into the image and checks the result against Redump again. It never makes the rip worse.
You can repeat this as often as you like, for example with another drive. New rip rips the whole disc again instead.
Checking an earlier rip against Redump
A rip made with Redump off, or with an older version, shows not checked against Redump. Check against Redump computes the MD5s from the file on the hard disk (the disc is not read) and writes the result into the rip's log.
Game list
The game list shows every game image on a hard disk or USB drive, not only the rips PSX RiPPER made: its format, whether it is free of errors, and whether it matches Redump. Open it from the settings: START, then on the first row, Games.
What it lists: every .bin/.cue, .iso and .img in the PSXISO folder of the source,
in alphabetical order. The discs of one game in one folder (Disc 1, Disc 2, … or CD1, CD2, … in names from other tools) are one row,
n discs, and the row shows the worst status of its discs. Up to 1000 discs per source are
listed; with more, the list says so.
| Button | In the list |
|---|---|
| ↑ ↓ | Select a game |
| L2 / R2 | Jump to the previous / next letter |
| Details | |
| Check the selected game against Redump | |
| START | Check all: every game shown that is not checked yet (in the trash: empty it) |
| Move the game to the trash (in the trash: restore it) | |
| R1 | Filter |
| L1 | Clear the filter (shown while a filter is set) |
| SELECT | The next source |
| Back to the settings |
and START are only offered with Check against Redump on (online or local copy); otherwise the list says that Redump must be turned on. START is offered only while a game shown is not checked.
Sources: SELECT steps through Hard disk, USB 0, USB 1, … (with the drive's name when the app can read it) and All, every source at once. In All the line under the list says where the selected game is. The choice lasts until the app restarts: each start shows the hard disk. A USB drive that is pulled out shows … is not connected.
The summary at the top counts the whole source, not only the rows a filter shows, for example 142 games · 98 verified · 6 with errors · 12 re-rip · 1 broken.
The status of a row:
| Status | Meaning |
|---|---|
| Verified | Every track's MD5 matches Redump |
| Does not match | Checked, and the MD5s do not match Redump's (or Redump does not know the disc) |
| Not checked | No Redump result yet: press , or START for all of them |
| 1 error / n errors | The rip log still lists sectors that could not be read or were bad: put the disc back in and repair it (see Damaged discs and Repair) |
| Re-rip to verify | A 2048 image (data only, from another tool): Redump cannot be compared with it, so rip the disc again to verify it |
| Broken | An incomplete set: a .bin without its .cue, a .cue whose file is missing, a .bin.part left by a cancelled rip, a log or .md5 whose image is gone, or an empty or unreadable image |
After the status the row shows the format (2352 or 2048) and n discs or n tracks, and two
marks: Duplicate, when the same disc is there twice (the same disc ID and size, or the same
Redump name; with All, also on another source), and .sbi missing, for a PAL (glossary) game that uses
LibCrypt (glossary) and has no .sbi. The line under the list names the other copy of a duplicate.
Filter, opened with R1: four criteria, all of which must match; a game of several discs matches when one of its discs matches them all. ↑↓ select a row, ← → change it, L1 sets all to Any, closes and applies. The filter lasts until the app restarts: each start shows every game.
| Row | Values |
|---|---|
| Format | Any, 2352, 2048 |
| Redump | Any, Verified, Not checked, Does not match, Not verified (not checked or does not match) |
| Errors | Any, With errors, Without errors |
| Other | Any, Broken sets, Duplicates, LibCrypt .sbi missing |
| Show | Games, Trash |
The criteria set are shown above the list (for example 2048 · Not checked) with n of m, the rows shown of all.
Details, opened with : for each disc its status, format, disc ID, Redump's name, when and on which drive it was ripped, the size, the place, whether there is a cover picture, when it was last checked, LibCrypt, the other copy of a duplicate, every track with its MD5, the sectors with errors and the set's files. ↑↓ and L2/R2 scroll, checks the game, moves it to the trash, renames it, goes back to the list.
Checking games against Redump
checks the selected game: it computes the MD5 of every track from the files (the disc is not needed) and compares them with Redump, also for a game that was checked before. START does this for every game shown that has no Redump result yet, so a filter picks what is checked. A progress screen shows Game n of m, the file and the percentage; cancels the check: the game being checked and those not reached yet keep the result they had. At the end a line says how many were checked and how many could not be.
The result goes into the game's log next to the image: <name>.bin.log and <name>.bin.md5 for a
rip, <name>.iso.log and <name>.iso.md5 (or .img.log/.img.md5) for an image from another
tool. The row then shows its status like any other.
Not checked, with the reason on the screen: a 2048 image, a broken set, an image in several .bin
files, a game whose file names were too long for the list to read in full, and a game a drive is
working on right now. With Online a disc without a disc ID
is left out. If Redump cannot be reached, the check stops and the stored results stay as they
were.
Each check is a job in the audit log (Rips), like a check from a drive's tab. While a check runs, a drive cannot rip, repair or check that same file.
Renaming a game
in the details opens the file name screen for this game. It starts from the game's current
name: if a pattern gives that name (your File name setting, a ready-made one, or one made from
the name), that pattern is shown; otherwise your File name pattern, with Now:
The rename takes every file of the set named after it: the image (also (Track n) files), its
.cue, its log and .md5 (.bin.log, .iso.log, …), the cover .jpg and the .sbi. When an
.iso has the same name as a rip, the cover and the .sbi stay with the rip. The FILE lines in
the .cue are changed to the new names. The title in the log stays as it is.
It is refused when the name stays the same, when a game with the new name is already there, when a
drive or a check is using the game, or when the .cue is too big to be rewritten.
The trash
moves the game, all its files, to .trash in the same PSXISO folder. Nothing is deleted.
To see the trash, open the filter with R1 and set Show to Trash. There, restores the
selected game to its folder, and START empties the trash after a question that names the
number of games and their size: deletes, keeps them.
Emptying deletes only the files of the games the trash lists. Other files in .trash stay. With
All, the trash of every drive is emptied. It is final: deleted files cannot be restored, also not
from the audit log.
A game with the same name as one already in the trash cannot be moved there: restore it or empty the trash first. is not offered while a check runs in the list, and a game a drive is working on is not moved.
Undo in the audit log
Every rename, move to the trash, restore and emptying is a job in the audit log's Files domain,
listed under the game, and emptying under Trash. on the job, or on any of its rows, undoes the
whole job: the files go back to their old names and folder, and a renamed .cue gets its old
FILE lines. A game's files are always moved together, never one alone. An undone job can be
redone, as often as you like.
Undo and redo are refused, with the reason, when:
- a file of the game is no longer where the job left it (… is gone),
- a file is in the way at the old place (… is already there),
- the trash was emptied since (The trash was emptied: … is deleted),
- a drive or a check is using the game right now,
- the job is still running; a job that failed cannot be redone (The move failed and was put back), but what it left can be undone.
The emptying itself cannot be undone: its rows are records of what was deleted.
If a move fails halfway, the files already moved are put back, and the job is logged as failed. Should a file not go back either, the note says which one; undo the job in the audit log to bring the game back together.
A rip and an .iso with the same name
A folder can hold a rip (Game [SLUS_000.00].bin/.cue) and an .iso with the same name, for
example from another tool. They are two rows, and each has its own log and .md5
(.bin.log/.bin.md5 and .iso.log/.iso.md5), so each can be checked without touching the
other. If they are the same disc, both rows say Duplicate, and either can be moved to the trash.
Logs from earlier versions
Earlier versions wrote <name>.log and <name>.md5. The app still reads them. When the game
list reads a folder, it renames the logs it wrote itself (first line PSX Ripper rip log), and
their .md5, to the new names, for the image they belong to: the .bin when a rip has that name,
otherwise the single image. It is one job per folder in the audit log, listed under the folder
(Files → the folder → Rename logs), and can be undone there. The list does not rename it again
after an undo, but checking, ripping or repairing that game later writes its new name, and so
does the list once the game is renamed (its log then has the game's new name). A log another
program wrote, a name that is already taken, and a game a drive is working on are left as they are.
Several drives at once
Connect one or two SuperDrives (each on its own USB port); a tab appears for each. Every drive rips on its own: insert three discs and press on each tab, or let automatic start do it. Each tab keeps its own progress, events and result.
SELECT Device settings gives one drive its own settings (speed, re-reads, sector check, eject, automatic start) instead of the standard from START; All standard puts it back.
A SuperDrive that stops answering shows No answer. Press Eject, or unplug its USB cable and plug it in again.
Where the rips go
The default is /dev_hdd0/PSXISO/ on the internal hard disk, where webMAN finds PS1 games.
← → on a tab switches its destination between the hard disk and connected USB drives
(FAT32 or exFAT); the choice is remembered per drive. A disc already ripped to the destination
is recognized by its serial, also under another file name.
Each rip writes:
| File | Content |
|---|---|
<name>.bin / .cue |
The image: every track, raw 2352-byte sectors |
<name>.bin.md5 |
MD5 of every track |
<name>.bin.log |
The rip log: tracks, MD5s, Redump result, unreadable sectors (used by Repair) |
/dev_hdd0/tmp/sbi/<SERIAL>.sbi |
LibCrypt data, only for the PAL discs that use LibCrypt |
The log and the .md5 are named after the image they describe. Checking a single .iso or
.img from another tool against Redump writes <name>.iso.log and <name>.iso.md5 (or
.img.log/.img.md5); such a log says on its checked= line that it comes from a check, not a
rip. So a rip and an .iso with the same name in one folder each keep their own result.
Covers (<name>.jpg) and .sbi files keep the plain name, as emulators and webMAN expect.
Logs from earlier versions (<name>.log, <name>.md5) are still read, and the game list
renames them to the new names: see Logs from earlier versions.
The file name follows the File name setting; the default is %T [%D], for example
Final Fantasy IX (Disc 1) [SLES_029.65]. webMAN hides the part in brackets in its list.
Settings
START opens the settings. ↑↓ select, ← → change (saved at once), opens a sub-view, resets everything, goes back.
| Setting | What it does |
|---|---|
| Games | opens the game list |
| Read speed | Max, 8×, 4× or 2×. Max is right for most discs |
| Re-reads on read errors | How often the drive retries a hard sector in the slow pass |
| Sector check | Bit-perfect (default): checksums, double-check of sectors without one, slow re-reads. Check and re-read: without the double-check. Off: read once |
| Eject the disc when done | Eject after a rip or repair |
| Rip immediately when a disc is inserted | Start by itself: a rip for a new disc, a repair for one already ripped with known errors; never overwrites a rip |
| File name | ← → picks a pattern, edits your own with %T title, %R region, %D disc ID, %N Redump's full name |
| Check against Redump | Off, Online (looks the disc up on redump.org) or Local copy (no internet needed) |
| Local Redump copy | downloads Redump's PlayStation list (about 4 MB) for the local mode |
| Remote control | opens the switches for the remote view, MCP (glossary) and status.json (see below) |
| Webhooks | opens the address, headers, events and a test |
| Audit log | opens the audit log (see below) |
| Audit log sector data | How much disk space the log may use for undoing repairs: 1 to 256 MB, default 256 |
| About PSX RiPPER | The version, who made it, the source and the libraries |
Audit log
PSX RiPPER writes down every change it makes, so you can see what changed, when, and what started it, and undo it. Open it from the settings (Audit log; Ändringslogg in Swedish).
What is logged
- Rips: every rip, repair and Redump check with its result, and each sector a repair changed or a rip corrected in its later passes (verify, second pass): the old and the new bytes.
- Settings: every change, with the old and the new value. A change made in the config file while the app was off (over FTP) is logged at the next start, from the app itself.
- Files: every rename, move to the trash, restore and emptying of the trash from the game list, and the renaming of logs from earlier versions, with each file's old and new place.
- Source: each entry says what did it: the console's pad, the remote view's pad, an AI agent over MCP, the app itself (automatic mode), or an undo.
Secrets are never stored. Of a webhook (glossary) address or header the log only says that it was set or cleared, never the value.
Using the screen: four levels, opens and goes back. First the kind (Rips, Settings, Files), then the discs or the settings changes, then a disc's jobs, then one job's rows. undoes the selected item after a question: one row, one job, or everything on a disc (or redoes it, see below).
What can be undone
- A setting: it is put back, as long as it still has the value the change gave it.
- A repair's sectors: the old bytes are written back into the image, as long as the sector
in the image is still what the repair wrote and the saved copy has not been removed. The rip
is then checked again (MD5 and Redump) and the sectors that were unreadable or bad before go
back into the rip's
.bin.log, so Repair can try them again. - The sectors a finished rip corrected in its later passes, the same way: the image gets the first read back. Undoing a disc includes them.
- Not the rip itself, a check or a Redump result: they are records, not changes. Delete a rip yourself.
- A game's files (rename, trash, restore): they go back together, see Undo in the audit log. Not the emptying of the trash: deleted files are gone.
- Not a secret setting, since its value was never stored.
- Not a job that is still running, or the sectors of a rip that was not finished.
- Not the sectors of a file that was ripped again since: the new rip replaced the image they belonged to.
If something cannot be undone the screen says why. Undoing goes from the newest row backwards and stops at the first row that cannot be undone; the rows undone before stay undone. A large undo shows how far it got; closing the app stops it, and what was undone until then stays undone.
Redo: every undo is itself logged, as its own row. A row marked (undone) can be redone:
select it and says Redo (Gör om in Swedish); it applies the change again and the row is no
longer undone, so undoes it again, as often as you like. (The undo rows stay in the list as
history; on the newest one does the same.) A setting gets the value the change gave
it, as long as it still has the value the undo put back. A sector gets the repaired bytes again,
as long as the image still has the bytes the undo put back, and leaves the rip's .bin.log again;
the rip is checked again. The rules above apply here too (a running job, a file ripped again
since, a removed copy). A job or disc whose changes are all undone is redone the same way, oldest
row first, stopping at the first row that cannot be redone. The redo is logged as well, so it
can be undone again, and so on.
The sector copies are the only large part. They are limited by Audit log sector data; when the limit is passed the oldest copies are removed. Their rows stay in the log, but can no longer be undone.
Remote control and webhooks
Remote control in the settings: opens a menu with three switches. ↑↓ select one, ← → (or ) turn it on or off, goes back. The line at the bottom shows the address of the selected one.
| Row | What it does |
|---|---|
| Remote view | Open http://<the PS3's address>:8090/ on a computer or phone on the same network. It shows the app's screen and, under it, a pad: its buttons press the console's, so you can switch tabs or start a rip from the sofa Open it by the console's address (as shown on the TV), not by a host name such as ps3.local: the buttons only work from a page opened by the address. |
| MCP | An AI agent (an MCP client such as Claude Code) can read and control the app at http://<the PS3's address>:8090/mcp. While it is on, [MCP] is shown at the left of the title. See MCP |
| status.json | http://<the PS3's address>:8090/status.json gives the state of every drive for scripts |
All three are off until you turn them on; after an update from a version without these switches, Remote view on keeps the remote view and status.json on. The settings row shows On and the address while any of them is on. None has a password: keep them on your home network. (reset everything) in the settings turns all three off; a reset an agent makes over MCP keeps them as they are, so the agent keeps its connection.
Webhooks send an HTTP POST with a JSON body when something happens (a disc identified, a rip started, progress, finished, failed, a repair finished, the disc ejected, the app started), for example to a Home Assistant automation that sends a notification to your phone. See configuration for the payload.
Playing your rips
Mount the .cue with webMAN (the game list, or /mount.ps3/dev_hdd0/PSXISO/<name>.cue) and
start it from the XMB. Cobra applies the .sbi of LibCrypt discs by itself.
Logs
/dev_hdd0/tmp/psxrip.log: what the app did, for bug reports (remove webhook addresses and headers before you share it).<name>.bin.lognext to each rip: that rip's tracks, MD5s, Redump result and unreadable sectors (<name>.logfrom earlier versions).